Thursday, February 2, 2012

Mouthwatering Goodness!


Hello there! Today's card uses lots of new items (and new to me items) from the Occasions Mini and Sale-a-bration catalog. I had seen this layout on Maile Belle's blog and I really liked how she used the a die for the cut out portion. This card actually ended up coming out how I envisioned it. I love what that happens! The paper and stamp set are new from the Occasions mini. They are part of the Sweet Shop product suite. I went back and forth on this stamp set and paper. I really liked it as soon as I saw it but I just wasn't sure I would get enough use out of it. After thinking about it and then seeing some cards done with it, I decided to get it. I'm so glad I did. I'm really liking it. The paper is really fun and I love the colors. And I like that the stamp set is something different than the normal flowers or nature type sets I get. I like to venture out and get some different stamps to build my collection. Now on to the card. The Wisteria Wonder piece was embossed with the Stripes Textured embossing folder, which you can get for FREE from the Sale-a-bration catalog. I then die cut that piece with the Labels Collection framelits die. Behind the opening, I added a piece of the Sweet Shop DSP. (Love those little hearts). Then I used the Mouthwatering set to stamp the ice cream cones. I actually stamped the ice cream cone 3 times. The cone in Crumb Cake, the ice cream in Pool Party and Lucky Limeade and the cherry in Real Red. I cut out each of these pieces and then layered them with dimensionals. Then I wrapped some Pool Party bakers twine around the Wisteria Wonder piece, made a bow and then added the sentiment from Party This Way. I added 2 pearls to the sentiment and colored them with the Wisteria Wonder marker. Thanks for stopping by and taking a peek at today's card!!

Stamps: Mouthwatering, Party This Way
Paper: Crumb Cake, Wisteria Wonder, Sweet Shop DSP
Ink: Crumb Cake, Pool Party, Lucky Limeade, Real Red, Black
Accessories: Stripes Textured Embossing folder, Labels Collection Framelits die, Pool Party Baker's twine, Modern Label punch, pearls

Monday, January 30, 2012

Aviary Love


Hello! I hope everyone had a nice weekend. Mine was spent doing some cleaning and organizing....fun stuff! Haha! Today's card is the other card that I made for my coworker to choose from. I think this one is more over the top than the one from Friday. And this is the one he ended up picking for his fiance. I just love how this came out. It is so pretty! :) The flowers were fun to make too. Especially since I rarely use them on cards because they would make it too bulky to send. They would be good for hand delivered cards. The gray background is stamped with one of the flower images from Fabulous Florets. I used the new Labels Collection framelits die behind the oval. I love these new dies too. They add just the right touch to a card. Then I cut out and embossed the oval with the Designer Frames embossing folder. I stamped the bird card and the 2 bird from the Aviary set. The Pink Pirouette hearts were stamped with a non-SU stamp. Then the Pink Piroutte strip was embossed with the Pefect Polka Dots embossing folder. To make the flowers I punched 3 scallop circles. Two circles were punched with the 1 3/4 scallop circle and the other was punched with the 2 3/8 scallop circle. I did add rhinestones to all 3 flowers. It's hard to see it in the one flower. It got pushed to the bottom of the flower but it's there! The leaves are just cut free hand. I actually decorated the inside of this card too but I forgot to take a picture. Have a great day!

Stamps: Aviary, Fabulous Florets, Teeny Tiny Wishes
Paper: Black, Basic Gray, Pink Pirouette, Real Red, Pear Pizzazz
Ink: Black, Real Red, Pink Pirouette
Accessories: Designer Frames embossing folder, Perfect Polka Dots embossing folder, Labels Collection Framelits die, Dotted Scallop Ribbon border punch, 1 3/4 Scallop Circle punch, 2 3/8 Scallop Circle punch, Modern Label punch, rhinestones

Friday, January 27, 2012

Banner Love


Happy Friday!! I am glad that it is the end of the week even though it is a gloomy day here. But at least I have a fun and bright card. I was asked by a coworker if I could make a Valentine's card for his fiance. He wanted something over the top.....oooo fun! So I designed 2 different cards for him to choose from. Today's card is the first one I made. I had a lot of fun making it and I think it came out cute. For the clouds in the background I punched out several scallop circles and then ran them through the Big Shot with the Perfect Polka Dots embossing folder. I then cut them in half to make the cloud shapes. I then punched out some pennants to make the cute banner. I bought that punch a long time ago and this was actually the first time I used it. Before I punched out the Pink Pirouette pennants I stamped them with the pennant image from Party This Way. At the end of the banner I added 2 bows with the Pool Party baker's twine. I love the color of this! Maybe that's because I'm in LOVE with Pool Party. And then I added some glittered hearts to each pennant. For the bottom, I cut out a strip of Pear Pizzazz DSP and added a Pear Pizzazz seam binding. Isn't this a cute Valentine's card or even just a cute card to say I love you. I will try to stop by over the weekend with the other card I made. I love that one too. It came out really nice and over the top, haha!! Enjoy your weekend!!

Stamps: Party This Way, Valentine Defined
Paper: Crumb Cake, Pool Party, Pink Pirouette, Real Red, Pear Pizzazz DSP
Ink: Pink Pirouette, Real Red
Accessories: Heart-to-Heart punch, Petite Pennants Builder punch, Scallop border punch, Scallop Circle punch, Pool Party baker's twine, Pear Pizzazz seam binding, Brights buttons, Dazzling Details, Perfect Polka Dots embossing folder

Wednesday, January 25, 2012

Field Flowers thank you


Happy Wednesday everyone! Today's card is one that I did a while ago but I don't think I ever posted it on here. This is a pretty quick and simple thank you card. It's even quicker if you decide not to cut out the flowers. Two step stamping makes it quick and look really nice at the same time. The touch of glitter from the glimmer paper gives it a nice extra touch as well. For the bottom green piece, I just stamped one of the flower images randomly on the sheet to make my own designer paper. I hope you like it. I hope to be back in a day or 2 with some Occasions mini and Sale-a-Bration samples. I also have a super cute Valentine's card that I will be sharing too!!


Don't forget, Sale-a-Bration has started!!!! Place your order now to receive some fun new products!!! The new Designer paper is to die for!! :) Click on my store to the right to place your order.


Stamps: Field Flowers
Paper: Early Espresso, Old Olive, Silver Glimmer
Ink: Calypso Coral, Poppy Parade, Old Olive, Soft Suede, Early Espresso
Accessories: Early Espresso tafetta ribbon, Eyelet border punch

Thursday, January 12, 2012

New Goodies!

Hello! It feels good to be back into the swing of things a little more. My energy has picked up a bit along with some creative juices. I hope I can keep this going for a little bit. New stuff always helps to get the mojo back. :) Today I'm showing some new things from the Occasions mini and from the upcoming Sale-a-Bration. I LOVE this new paper from Sale-a-Bration! I think I like all of the fun bright colors that it uses. It kind of helps to get out of this winter funk. The set I used is called Tea Shoppe from the Occasions mini. I really liked this set when I first saw it in the catalog but I wasn't sure how much use I would get out of it. Now after playing around with it a bit, I'm really liking it more and more. The little tea cups are just so cute. So this group of cards is for my next class in February. In the class we will also be making a cute tea bag holder (not shown).


Class Details:
You will make 4 cards, a tea bag holder and receive your own Pool Party bakers twine.
Date/Time: Wednesday February 8th at 7:00pm
Location: My house in NJ
Cost: $22
RSVP: Monday January 30th.


If you are interested in this class and are in the NJ area, please send me an email!

Tuesday, January 10, 2012

Happy New Year!

Well, well, well. It's been quite a well since I've posted on here. I haven't forgotten about the blog, I've just been in a long creative funk and haven't had the energy to create or share anything. I do have a couple of Christmas projects to share which I'll just share here in one post. Since Christmas is way gone, who wants to see that stuff anymore, lol! However, I do have one project from the Creative Crew last month that is not Christmas so you'll get a little something Valentines-ish.
Now I have a very good reason for my absence and why I think I lost my creative juices for a while. :) It's because we are expecting a new little bundle of joy in July!! So basically since the end of October until the end of the year, I have been exhausted and lazy!!! I am just now finally starting to pick up a little more energy and now that the Occasions mini is out with some new things, I've been back to my craft room, doing a few things. So my hope is to try to post a little more often now. That is my plan. We'll see how that goes considering that I will be working on 2 sets of invitations to be done by March. I am going to be busy busy! But I promise to post more than once every 3 months, haha!
So here is some eye candy from last year. The frame and the hearts card were done for the Creative Crew in December. Which by the way you should definitely try out the challenges for this month. They look so fun! The other 2 cards were Christmas cards that I had sent out.


I hope everyone had enjoyed their holidays and had a happy new year!!

Thursday, November 17, 2011

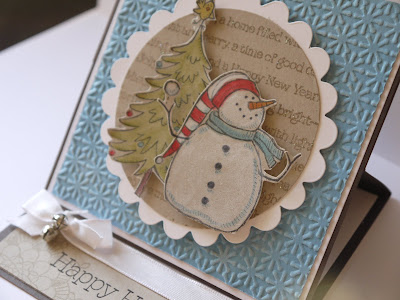
Snowman Easel Card


Hello! I know it's been a while again. Ever since we lost power for a week, I have been out of sorts with my crafting and I just can't get my groove back on with it. I've barely stamped anything in the past 3 weeks! Shocking!! But I do have one of my Creative Crew projects for November to share. For this project we were to make an easel card and use the colors or DSP from the Letters to Santa collection. This is my first time making an easel card and it was pretty fun. I would definitely do it again. Since I didn't have the Letters to Santa DSP, I just used some of the colors from it. For the Crumb Cake circle I stamped one of the sentiments repeatedly in versamark and then embossed it with irridescent ice powder. It looks really sparkely in real life. You may be able to see some of the sparkles if you click on the close up pictures. I was really happy with how that came out. Then I cut out and colored the Christmas tree and snowman. I colored the snowman in with a white colored pencil. For the Marina Mist piece that I embossed with the Snow Burst embossing folder, I sponged some white ink over the snowflakes to make them stand out a little bit. Then I added some ribbon and those super cute mini jingle bells. I hope you like it and decide to try out an easel card!! Have a nice day!


Stamps: Snow Much Fun, Many Merry Messages, Delicate Doilies
Paper: Crumb Cake, Marina Mist, Early Espresso
Ink: Crumb Cake, Early Espresso, Black Stazon, Old Olive, Marina Mist, Riding Hood Red, White Craft
Accessories: Blender Pens, Mini Jingle Bells, White Taffeta ribbon, Snow burst Embossing folder