Wednesday, December 22, 2010

Sneak Peek - Valentine Defined (again!)


Hello there! I hope everyone enjoyed all of the projects from the Tour de Freaks blog tour. I loved everything everyone did! It was a nice break from all of the holiday posts lately. I'm excited for Christmas but I'm done with making christmas cards. I'm ready to move on to valentine and spring cards. So for today's card, I have a cute Valentine's card or just an I love you card. I used the Valentine Defined set but did not use the tree this time. I used the cute little flamingos instead. In the close up photo you can see that they are embossed with iridescent ice to make them sparkley. The circle behind them is stamped with the valentine definition stamp from the set. It is layered on a pink pirouette scalloped circle. And then I used the new Love Impressions paper. I actually don't have this paper yet so I decided to download the designs on My Digital Studio and then print out what I wanted. The download has less designs that the actual collection does but it still works when you don't feel like waiting to get the paper. :) The last thing I did was add some ribbon, a button, and the "love" tag. I used the Lots of Tags sizzlets and then just cut the tag to the size I wanted. In case I don't get a chance to post before Christmas, I want to wish everyone a Merry Christmas!! I hope everyone has a great holiday!!

Sunday, December 19, 2010

Tour-de-Freaks: Occasions Mini


Welcome to the December 2010 Blog Tour. If you've just arrived from Iliana's blog, you've come to the right place! But don't worry, if you have started here, it will be possible to go completely to the end and arrive back here after going to the beginning of the tour!(If you are viewing this before the 20th, all the links may not be working so be sure to stop back again on the 20th).

This month's theme is Sneak Peek at the Occasions Mini and SAB catalogs. My 2 projects today use products from the Occasions Mini catalog. Another great mini catalog. Of course I want to buy everything in it! Everything is so fun and springy.


For my card I used the Valentine Defined set and You're a Gem (for the sentiment). I originally wanted to do something bold and bright with this set but I ended up with vintage. Which just shows you that this set is versatile and doesn't just have to be used for Valentine's either. I just love the tree image from this set and I can see myself using it a lot. I stamped the tree is Always Artichoke, Chocolate Chip and cut out 3 Rose Red hearts. I used a strip of the flower pattern dsp from the Springtime Vintage collection. Some lovely papers in this collection. I used the music notes wheel on the Crumb Cake cardstock. Then everything was sponged with Crumb Cake for the vintage look.


My 2nd project is a wall decoration. I have a lot of friends who are expecting babies so I thought this would be a cute gift idea for one of these friends. Hopefully someone will have a girl! I used some chipboard pieces from the On Board Mix and Match. I covered all of the pieces with paper from the Springtime Vintage collection. I stamped the crumb cake cardstock with the music wheels again. I don't know why I waited so long to get this wheel, it's fabulous! The banner in the top corner uses the Just Perfect alphabet. I actually didn't have any alphabet stamps so I just downloaded this set from My Digital Studio. I opened up a project and added these letters in Not Quite Navy, Rose Red, Always Artichoke, and Baja Breeze. Then I just printed it out on Crumb Cake cardstock and punched them out with the 3/4 circle punch. Then I put it all in a nice wood frame (without the glass) and it's now ready to go to a new baby girl!


Thanks for checking out my projects. I hope you are enjoying the tour. Next up is Lisa Young, with more fabulous projects!

Friday, December 17, 2010

More Christmas


Wow, where has these past week gone?! I had intentions of having a few posts this week but I don't know what happened, I just got really busy and I didn't have the chance. Anyway, here is another one of my Christmas cards that I sent out. The layout is cased from a card by Janine Tinklenberg. I used a strip of the Jolly Holiday DSP and cherry cobbler and old olive cardstock. This is a good layout for using some of the DSP scraps that you have lying around. I colored in one of the critters from Merry Crittermas with some copic markers and then added some chunky glitter around the edges. Overall this was a quick card except that I spent a bit of time coloring but that's ok, I like coloring. That's it for me today. Be sure to come back on the 20th for the Control Freaks Blog Tour. This month we will be featuring projects from the new occasions mini!

Friday, December 10, 2010

Sneak Peek - Valentine Defined


Happy Friday! I had a chance to play with one of the new sets from the Occasions Mini today. I can already tell that I love this set! When I saw it in the catalog, I fell in love with the tree image. I thought it was so cute. So of course that's the first image I played with. I can see using that image for non valentine's cards as well. Today's card could be for Valentine's day or it could just be an any time "love you" card or change the sentiment and use it for any occasion. All of the images are from the set; the line of hearts on the Baja Breeze background, the love you sentiment, the Pink Pirouette heart stems and of course the tree. I also cut out the little pink hearts on the tree and sprinkled them with dazzling diamonds. Oh what fun!!! I really love how this card came out. I can't wait to make more cards with this set. That's it for me today. I hope you enjoyed the sneak peek and I hope to have a couple more in the next week.

Wednesday, December 8, 2010

A Poppy Pizazz Holiday


Hi! Another holiday card for you today. Today’s color combo is a little different. It’s still red and green, just a different shade of them. I used Certainly Celery, Pear Pizazz and Poppy Parade. I am loving the poppy parade polka pot paper (say that fast!). This paper is the 6 x 6 pack that is part of the level 1 hostess sets. I hadn’t used any of that paper before but I just love these polka dots. I used the Aviary stamp set, which is not holiday related, but I added a couple of holly leaves to the bird cages and now they are ready for Christmas too. The holly leaves stamped on the vanilla piece is from Bells and Boughs. This card is pretty flat so it will make it easy to mail. I think I just need only a couple of more Christmas cards and then I will be officially done. I will probably make a couple more of this one (maybe in different colors). I have all my finished ones addressed and ready to go in the mail. I’m just waiting on some cute return address labels with my new name to arrive before I send them out. Now that the Christmas cards are almost done, I can now start playing around with some NEW stamps from the upcoming occasions mini once they arrive tomorrow. How exciting! Enjoy your afternoon.

Tuesday, December 7, 2010

Tiny Gift Bags


Hello all! I hope everyone had a nice weekend. Today I have some cute little gift bags for you. These brown bags are about 3.5 inches wide. A perfect bag to fill with candy or even cookies. I found the tutorial for the mouse punch art here. I pretty much followed her directions except used a different punch for the eyes. I then used the same directions and made a cute little teddy bear. For the mouse I sponged the edges with white craft and for the bear I sponged the edges with chocolate chip. I think these bags would be cute for little kids, or even adults...I think they are cute myself!
Tonight I will be writing out my christmas cards. I pretty much have them all finished except for a couple. But the majority of them are done. I'm so glad that I got them done so early. That's one big project to have off my shoulders. I'll post any more cards that I make in the next day or 2. Now I need to get focused on my shopping. Have a nice day!


Thursday, December 2, 2010

MDS Notecard Thank You


Hi! I interrupt all this holiday posting with a non Christmas project. Today, I'm showing you my wedding card thank you done with My Digital Studio. I knew that I wanted to do my own thank yous (of course, since I did lots of DIY for my wedding), but I was having a hard time finding a design that I liked online. And also find something that wasn't real expensive either. So then I thought about using MDS for the design of the thank you and then upload it to a site where I could have them print it (like vistaprint). But I still wasn't sure I wanted to do that either. So after fooling around with MDS, I figured out how to print my thank you on the 3.5 x 5inch notecards from Stampin Up. The thank you looks like its simple but it ended up taking me a while. The part that took me the longest was coming up with a design I liked and figuring out how to get it to print on the right section of the notecard. A couple of the original designs I had used our initials (J & J) but then I decided I didn't like that. And I didn't want to have "thank you" on the front, just in case someone wanted to put the picture in a frame or something. So after searching the different stamps in the program I found the "mr. & mrs." and I thought that worked good. I added that on top of the modern label punch and sized everything until I got it to how I wanted it. I do plan on adding something on the back to show that I designed it. Once I printed it, it didn't look quite as bright as it shows on the jpeg version but overall I'm really happy with how it came out. The photo of the actual card doesn't have the best lighting either so it isn't quite as dark as the photo may show. Now comes the fun part of writing all of these out...yeah right!
Tomorrow I will be back to the regular holiday posting. I have a few more holiday things to share.

Wednesday, December 1, 2010

Holiday Bags


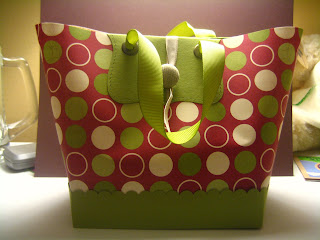
Hello! I saw this bag on splitcoast done by Heather Klump. I thought this was the cutest bag ever so I had to try it for myself. Well I got a little crazy and ended up making 4 of them! I only photographed 3 of them (I messed up the first one a bit). I actually could have made a few more, I probably will, but I currently don't have any sticky strip so I can't make any until I get more. I followed Heather's instructions and they were pretty easy to do. Once I did one, I got the hang of it and they were really easy. They are a good size and fairly sturdy so you can put a few things in there. This was also a good way for me to use up some retired paper I have (although only one in the photo uses retired paper). Well I hope you enjoyed these and I hope you think they're as cute as I do!!